lunes, 31 de marzo de 2014

Layout my dream

¿Habéis visto que foto más bonita? No, no es mía (¡ya me gustaría!), es de una fotógrafa que hace maravillas, Christilou. Encontré la foto en flickr y me gustó tanto que le pedí permiso para utilizarla en un layout.

Hice ballet durante varios años y me encantaba, ¡lo contenta que me puse cuando empecé a usar las puntas! así que fue ver esta foto y enamorarme. La verdad es me gustan todos los tipos de baile y si puedo ir a algún espectáculo o musical no lo dudo, disfruto como una enana. Lástima que tenga la agilidad de un pato, porque me hubiera encantado ser bailarina.

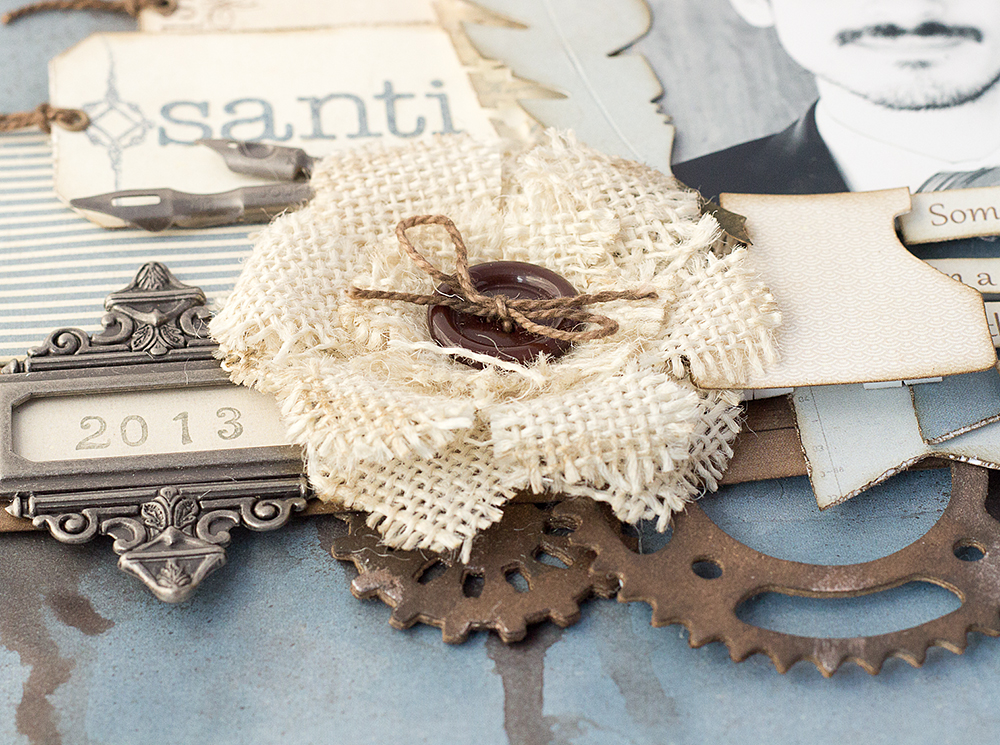
En este layout utilicé dos colecciones de Pion Design, Flower Frames y Studio of Memories que había estrenado aquí y aquí. En el fondo añadí textura con pasta de relieve y algo de color con tintas. Luego ya fue añadir capas y varios adornos.

Have you seen the beautiful picture I used in this page? It's from Christilou, such a talented photographer! I saw her photo in flickr and liked it so much that I asked her permission to use it on a layout. 

I used to dance ballet and I loved it. I was so proud when I started dancin on pointe!! So I saw this photo and fell in love. I really like all kinds of dances, and love going to musicals and ballet shows. I would have loved to become a dancer but I'm not agile at all. 

I used two Pion Design collections for this layout: Flower Frames and Studio of Memories, which I also used  in this work and this one. I added some texture with a stencil and texture paste, and when it dried I applied some pink ink. 


Productos:
Papeles: Pion Design (Flower Frames y Studio of Memories).
Troqueles: Joy Crafts (Feathers, Frame), Cheery Lynn (Fanciful Fourish, French Pastry Doily),Quikutz (Sugar cookie alphabet), Memory Box (Musical Interlude)
Flores: Prima
Tinta: Prima comfort chalk edgers, distress ink walnut stain.
Adornos: Prima (cremallera y reloj de resina)

Supplies:
Papers: Pion Design (Flower Frames and Studio of Memories).
Dies: Joy Crafts (Feathers, Frame), Cheery Lynn (Fanciful Fourish, French Pastry Doily),Quikutz (Sugar cookie alphabet), Memory Box (Musical Interlude)
Flowers: Prima
Ink: Prima comfort chalk edgers, distress ink walnut stain.
Embellishments: Prima (zipper y resin clock)

sábado, 29 de marzo de 2014

Esperando el veranito

Estos días que vuelve a hacer fresco una ya está pensando en el verano, y eso que no me gusta demasiado el calor, pero al menos ir sin abrigo...Así que me he consolado con esta tarjeta veraniega con la colección Shoreline Treasures (Pion Design). La imagen de las chicas en el mar me gustó mucho en cuanto la vi y quise usarla como elemento central de la tarjeta. Lo demás ya fue ir decorando con papeles de la colección y algunos adornos.

I usually don't like summer very much (it's  too hot in Madrid) but warmer temperatures would be nice right now...So I made this summer card with Shoreline Treasures collection (Pion Design).I loved the bathing girls image  when I saw it and decided to use it as the focal point of my card. Then I decorated it with more papers from the collection and some embellishments. 


Productos:
Troqueles:Memory Box (Valerian Flourish)
Flores: Petaloo, Iamroses


Productos:
Dies: Memory Box (Valerian Flourish)
Flowers: Petaloo, Iamroses

miércoles, 26 de marzo de 2014

Una tarjeta para scrapmatts

¿Qué tal va la semana? Por aquí ha vuelto el frío...en el momento más adecuado que se nos ha estropeado la calefacción, ¡qué mala suerte!  Pero bueno, que todo sea eso.
Hace unas semanas os enseñaba un tag que hice para Scrapmatts, para el Craft Show. Hoy subo con la tarjeta que hice a juego utilizando los mismos papeles. ¡Gracias por visitarme, y que tengais un buen día!

A few weeks ago I posted a tag I made for Scrapmatts, for the Craft Show. Today I'd like to show you the card I made with the same papers and colors. Thanks for looking!


Productos: 
Papeles: Hollywood Vogue (Websters Pages)
Troqueles: Memory Box (Lavish Branch), Cheery Lynn (French Pastry Doily), Spellbinders (Picot Ege)
Chipboards: Scrapmatts
Flores: Prima
Perlas: Prima
Tintas: walnut stain (distress ink)
Otros: Pintura acrílica blanca

Supplies: 
Papers: Hollywood Vogue (Websters Pages)
Dies: Memory Box (Lavish Branch), Cheery Lynn (French Pastry Doily), Spellbinders (Picot Ege)
Chipboards: Scrapmatts
Flowers: Prima
Pearls: Prima
Inks: walnut stain (distress ink)
Other: Acrylic paint (white)

lunes, 24 de marzo de 2014

Me pareció ver un lindo gatito

Hoy vengo con otro de los trabajos que hice con la colección "A Day in May" (Pion Design) que tanto me gusta, esta vez utilizando solo los tonos marrones. 
Quise hacerle una página a mi gato, Turbo, porque me di cuenta de que hacía tiempo que no le sacaba fotos ni nada, pobrecito mío. Va para 9 añazos ya y es todo un señor gato, perezoso y adorable No le gusta nada que le saque fotos y siempre se las arregla para cerrar los ojos en el peor momento,  se mueve y me la estropea...pero con paciencia todo se consigue jejeje

Today's layout was made with "A Day in May" (Pion Design) collection, which I love so much. This time I focused on the brown and cream tones.
I wanted to make a page about my cat, Turbo, because I realised I didn't have recent photos of him. He'll turn 9 soon and is a big, lovely and lazy cat. He's not very good at posing: he closes his eyes, moves a lot...but finally I got some pics and made this page. 


En el fondo utilicé tinta con una máscara de malla de gallinero y luego empecé a añadir capas y más capas. Las flores están hechas a mano, salvo las más pequeñitas. El titulo son thickers embosados, y todos los chipboards menos la hilera de pajaritos son caseros también. La jaulita está recortada de un papel de la colección Vintage Garden (Pion Design).

I used a chickenwire mask and brown ink on the background. Then I started to add layer and more layers. Flowers are handmade (except for the smallest ones). I embossed thickers for the title. The birds chipboard is from Petaloo, all the other ones are handmade. I cut the birdcage from the Vintage Garen papers (Pion Design)


Productos:
Papeles: Pion Design (A Day in May)
Troqueles: Rose Creations (Spellbinders), Bitty Blossoms (Spellbinders), Foliage (Spellbinders)
Sellos: Simply You (Technique Tuesday), Crystal (Toga), Toil and Trouble (The Girls Paperie), sellos de cling sin marca.
Polvos de embossing: Espresso (Adirondack), transparentes de Hero Arts
Máscaras: Chickenwire (The Crafter's Workshop)
Tintas: Walnut stain (distress ink), dark bark (prima comfort chalk edgers)
Otros: Silhouette Cameo, Mod Podge molds, pintura acrilica, Thickers (American Crafts)

Supplies:
Papers: Pion Design (A Day in May)
Dies: Rose Creations (Spellbinders), Bitty Blossoms (Spellbinders), Foliage (Spellbinders)
Stamps: Simply You (Technique Tuesday), Crystal (Toga), Toil and Trouble (The Girls Paperie), cling stamps from my stash.
Embossing powders: Espresso (Adirondack), clear  from  Hero Arts
Masks: Chickenwire (The Crafter's Workshop)
Inks: Walnut stain (distress ink), dark bark (prima comfort chalk edgers)
Other: Silhouette Cameo, Mod Podge molds,acrylic paint, Thickers (American Crafts)

viernes, 21 de marzo de 2014

Combinando colores en scrap

¿Os acordais de la rueda cromática que se veía en el colegio? Al menos a mi me tocó, teníamos que hacer un collage y varias cosas del estilo. Pues hoy me gustaría enseñaros una herramienta para utilizarla y poder combinar fácilmente los colores. La verdad es que me parece realmente útil y puede que en algún momento de bloqueo os sirva de ayuda.

Está en la página Scrapbook.com, que es uno de los mayores portales dedicados al scrap. Entramos en la página principal y bajamos hasta ver la opción de "scrap by color". 

Sometimes I have a hard time combining colors, and there's an online tool that I love to use when I have this problem. It's in scrapbook.com, if you scroll down the main page you'll see an option that says "scrap by color"


Una vez ahí podemos hacer click en uno de los colores de ejemplo o ir directamente a la rueda cromática y seleccionar el que queramos

We can choose one of the main colors that appear or click on "color wheel" and choose a color from a wider range


Tanto si le damos a un color como si hacemos click en "color wheel" nos llevará a esta otra página, donde a la izquierda tenemos una rueda de color y podemos seleccionar el que queramos combinar.

When we click either a color or the "color wheel" link we'll see an new page with a color wheel on the right to choose the exact color we want. 


En la parte inferior de la pantalla nos da la opción de comprar productos de scrap con el color que hayamos seleccionado. Con los gastos de envío que tiene esta página no nos interesa comprarlos, pero sí podemos tomar nota de cuales son y buscarlos aquí. 

At the bottom of the page we have some suggestions of products with the same color we chose. 


En la parte derecha de la pantalla tenemos las distintas opciones para combinar colores, basadas en la rueda cromática. Podemos crear una gama de color monocromática, complementaria, análoga...si vamos haciendo click en cada una de las opciones nos mostrará las distintas combinaciones

At the right we have the suggested color palettes using different type of combinations (monochrome, complementary...)


Y ahora viene la opción más interesante, al menos desde mi punto de vista. Si nos fijamos en la pantalla principal vemos que hay una pestaña que dice "photo match". Hacemos click y nos dará la opción de subir una foto. 

And now let's see one of the most useful options (al least in my opinion). There's a tab that says "photo match". If we click on it we'll be able to upload a photo and get the matching colors.


Cargamos el archivo y le damos a "upload photo"

Browse the file and click on "upload photo"


Y una vez que se haya cargado nos dará varias opciones de colores que combinan con nuestra foto. ¡Una maravilla cuando tenemos fotos difíciles!

And when it's uploaded we'll see all the matching colors


miércoles, 19 de marzo de 2014

Una tarjeta rápida y sencilla

Como comenté ya cuando enseñé este layout, tengo bastantes trabajos en la recámara con la colección A Day in May de Pion Design. Hoy os enseño uno bastante sencillo, una tarjeta que hice para aprovechar un poco los restos que me iban quedando. 

Tendré que hacer unas cuantas más porque sigo teniendo restos para aburrir y ya no sé cómo guardarlos...¿vosotras cómo hacéis? Antes tenía una caja con todos los restos juntos, pero nunca los usaba y se iban acumulando. Ahora he optado por guardarlos con el resto de la colección pero es muy incómodo (y sigo sin usarlos).

As I mentioned in a previous post, I did lots of works with A Day in May papers (Pion Design). Here's anther of them, a pretty simple card I made with the leftovers from the other projects. 

I'll have to make some cards more because I still have lots of leftovers and don't know what to do with them...How do you store yours? I used to have a big box for them, but I always forgot to use them and the pile was getting huge. Now I store them with the rest of the collection but it's a not a very good solution either.


Como veis no tiene mucha miga...lo único que la flor está teñida con tinta Versamagic (mezclada con agua a modo de acuarela).

I painted the flower with Versamagic ink (mixing it with water)


Productos:
Papeles: Pion Design (A Day in May)
Flor: Prima (Serenity)
Adornos: Petaloo
Sello: Technique Tuesday
Troqueles: Spellbinders (Foliage)
Tintas: Distress ink (walnut stain), Prima comfort chalk edgers (dark bark)

Supplies:
Papers: Pion Design (A Day in May)
Flower: Prima (Serenity)
Embellishments: Petaloo
Stamp: Technique Tuesday
Dies: Spellbinders (Foliage)
Inks: Distress ink (walnut stain), Prima comfort chalk edgers (dark bark)

lunes, 17 de marzo de 2014

Layout para Pion Design y un tutorial

Hace poco que me llegó la colección Shoreline Treasures y me faltó tiempo para ponerme a trabajar con ella.  Como tiene unos tonos de azul preciosos quise hacer una página más masculina, con unas fotos de mi hermano. Aproveché para estrenar algunos troqueles nuevos (el alambre de espino, los engranajes...) y me contuve mucho con los adornos. Vale que tiene una flor ¡pero sólo una! todo un reto para mi

Last week I received the new Shoreline Treasures (Pion Design) collection and as soon as I opened the box I started to work with it. It has gorgeous blue tones, so I thought they'd be great for a masculine page, featuring some pics of my little brother. I also had some new dies I wanted to use (the barbed wire, the gears...) and tried not to add too many "girly" embellishments. Ok, there's a flower...but just one!! 


En el papel de fondo usé mists y estampé también varios sellos. Todos los chipboards son caseros y están hechos con troqueles de la Big Shot. La flor está hecha con un troquel también y tela de saco.

I misted and stamped the background. All chippies were handmade using cutting dies. I made the flower with burlap. 


Productos:
Papeles: Pion Design Shoreline Treasures
Troqueles: Spellbinders (Sprightly Sprockets), Cheery Lynn (Chicken Wire), Taylored Expressions (Film Strip Border), Dienamites (Scrolly Corner), Impression Obsession (Alphabet Typewriter Lower Case), Tim Holtz (Writing Desk)
Mists: Lindy's Stamp gang, Glimmer Mist
Tintas: distress ink (walnut stain), Prima comfort chalk edgers (dark brown)
Otras pinturas: Distress metallic stains (antiqued bronze)
Eyelets: we r memory keepers
Adornos de metal: Tim Holtz. 

Supplies:
Papers: Pion Design Shoreline Treasures
Dies: Spellbinders (Sprightly Sprockets), Cheery Lynn (Chicken Wire), Taylored Expressions (Film Strip Border), Dienamites (Scrolly Corner), Impression Obsession (Alphabet Typewriter Lower Case), Tim Holtz (Writing Desk)
Mists: Lindy's Stamp gang, Glimmer Mist
Inks: distress ink (walnut stain), Prima comfort chalk edgers (dark brown)
Other paints: Distress metallic stains (antiqued bronze)
Eyelets: we r memory keepers
Metal embellishments: Tim Holtz. 


Y ahora vamos con el tutorial para hacer la lazada de adorno. Esto no es idea mía, hay un montón de formas de hacerlo (y un montón de tutoriales), pero aquí os enseño cómo lo hago yo.

And here's a short tutorial of how I made the lacing. This is just the way I do it, there are lots of different lacing tutorials. 


viernes, 14 de marzo de 2014

Layout Athabasca

¡Ya es viernes! Y además ya queda manos para el taller de Limor Webber, estoy impaciente :) ¿Alguna de vosotras va también? yo estaré en el del viernes 28

Hoy me gustaría enseñaros una página que hice con una de mis fotos favoritas, en el Glaciar Athabasca. Una de las cosas que más ilusión me hacían del viaje era esto precisamente..vamos, yo en un glaciar ¡qué emoción! Ahora me he quedado con el gusanillo de visitar Alaska, tal vez algún día...

It's friday!!! And soon I'll be attending to Limor Webber's workshop, I'm looking forward to it!!

Today I'd like to share a page with one of my favorite pictures, in the Athabasca Glacier. The glacier was one of the things I was more excited about in our trip...walking on a glacier, isn't that amazing?? Now I'd love to travel to Alaska, maybe some day...


En esta página no toqué mucho el fondo, solo tiene un poco de gesso en algunas zonas. Los chipboards son todos de scrapmatts y están alterados con pintura metálica y sprays. Las flores azules están hechas a mano.  y los recortes son de los papeles.

I didn't alter de background much in this page, only applied a thin coat of gesso in some places. The chipboards were misted and painted with metallic paints. The blue flowers are handmade, and I did lots of fussy cutting.

Productos:
Papeles: Bo Bunny (The Avenues)
Chipboard: Scrapmatts
Troqueles: Spellbinders Rose Creations
Flores: A little Birdie
Mists: Lindy's Stamp Gang, Glimmer mist (Tattered Leather)

Supplies:
Papers: Bo Bunny (The Avenues)
Chipboard: Scrapmatts
Dies: Spellbinders Rose Creations
Flowers: A little Birdie
Mists: Lindy's Stamp Gang, Glimmer mist (Tattered Leather)

miércoles, 12 de marzo de 2014

Secret Box

Hace ya un tiempo que me compré la scoring board de Martha Stewart y empecé a recopilar tutoriales de cajitas, bolsas y sobres para hacer con ella. La verdad es que hay inspiración para aburrir, ¡quien pudiera hacer todo! Hace poco añadí a mi carpeta de inspiración una secret box que me encantó y en cuanto tuve un poco de tiempo decidí hacerla. Me costó un poco acertar con las medidas, pero al final me las apañé para terminarla y aquí está. El tutorial podeis encontrarlo aquí

When I bought the Martha Stewart Scoring Board I started to recopilate tutorials of boxes, bags and envelopes. There are so many beautiful things to do!! I wish my days had more hours... Last month I found a tutorial to make a cute secret box, and as soon as I coud I gave it a try. I had some trouble measuring (as always) but finally I had my secret box! You can find the tutorial here


La verdad es que aparte de seguir el tutorial no tiene mucho más...capas de papel y pocos adornos. Al final del post podéis ver la lista de material empleado.  Las flores están hechas a mano con un troquel de joycrafts.

It's quite simple...just some layers and few embellishments. The supplies list is below. The flowers are handmade with a joycrafts die. 


Productos:
Papel: Pion Design (A Day in May)
Troqueles: Spellbinders (picot edge), Nellie Snellen, Memory Box (lavish branch), sizzix sizzlits (circles), joycrafts (flowers 6002-0068).
Sellos: Kesi Art
Troqueladora: Martha Stewart Cherish
Tintas: distress ink (walnut stain), prima comfort chalk edgers (dark bark).

Supplies:
Paper: Pion Design (A Day in May)
Dies: Spellbinders (picot edge), Nellie Snellen, Memory Box (lavish branch), sizzix sizzlits (circles), joycrafts (flowers 6002-0068).
Stamps: Kesi Art
Punch: Martha Stewart Cherish
Inks: distress ink (walnut stain), prima comfort chalk edgers (dark bark).

lunes, 10 de marzo de 2014

Layout our honeymoon

Esta semana vi en CSI:Colors, stories, inspiration un reto con unos colores que me gustaron mucho, azul, verde, amarillo...un combo muy bonito. No sé si conoceis la página, se trata de una web de retos semanales donde tienes que cumplir unos requisitos, el primero es utilizar los 5 colores del combo. Después hay una lista (evidence) que trata de adornos o técnicas que puedes emplear, tienes que elegir dos (mínimo). Por último hay otra lista (testimony) en la que te dicen temas sobre los que hacer tu journaling o formas de hacerlo (por ejemplo, en círculo, en un tag..) y de esta última  lista tienes que elegir una forma o tema también. Tu página debe cumplir todos estos puntos y todas las semanas se eligen layouts destacados para cada reto.

When I saw this week's challenge at CSI: colors, stories, inspiration I loved the sweet and soft combo (green, blue, yellow...). I don't know if you already know how their challenged work. You have to make a page with all 5 colors incuded in the combo. There's a list "evidence" with embellishments or techniques and you have to choose (and use) at least 2. Finally, there's another list (testimony) with  journaling themes or ideas and you have to select one idea from that list. There's a challenge everyweek and they feature some works on their ning site. 


Como me gustó tanto el combo me decidí a participar y uno de los temas que podías elegir era "journal on a dream vacation", así que elegí una de las fotos que hicimos en el viaje de novios.

Utilicé papeles de Pion mezclando distintas colecciones para conseguir todos los tonos del combo y además añadí algo de textura con una máscara de Prima y pasta de relieve. Después recorté algunos papeles para añadir varias capas y empecé a jugar con mis nuevos troqueles, ¡son de bonitos!. Últimamente me ha entrado un ansia troqueril terrible y todas mis compras son troqueles para la big...y la wish list tampoco para de crecer. Ya para darle los toques finales añadí las flores y los brillos (los adornos que elegí de la lista "evidence"), eché Glossy Accents en el título y recorté algunos motivos de los papeles para adornar. 


As I liked this week's combo so much I decided to participate. One of the ideas on the testimony list was "journal about a dream vacation), so I chose to make my page about our honeymoon, with one of my favorite pictures.

I used Pion papers mixing different collections. I also used a Prima mask and texture paste to on the background. Afterwards, I started adding layers and playing with some of my new dies, they're so cute! Lately it seems I only buy dies...and my wish list keeps growing. Finally I added some flowers and crystals (my "evidence"), applied a coat of Glossy Accents to my title and did some fussy cutting on the papers. 


Algunos detalles del layout

Some close-ups


Productos:
Papeles: Pion Design (Flower Frames, Vintage Garden, A Day in May)
Troqueles: Cheery Lynn (Honeycomb), Nellie Snellen (Hearts), Spellbinders D-lites (Bluebells and lily of the valley), Spellbinders (Bitty Blossoms, Foliage), Quickutz (Sugar cookie alphabet)
Sellos: Tim Holtz, Toga.
Flores: Prima
Bling: Kaisercraft.
Tintas: Prima chalk edgers (knotted wood, white), Distress (walnut stain), Versamagic (Aegean blue)

Products:
Papers: Pion Design (Flower Frames, Vintage Garden, A Day in May)
Dies: Cheery Lynn (Honeycomb), Nellie Snellen (Hearts), Spellbinders D-lites (Bluebells and lily of the valley), Spellbinders (Bitty Blossoms, Foliage), Quickutz (Sugar cookie alphabet)
Stamps: Tim Holtz, Toga.
Flowers: Prima
Bling: Kaisercraft.
Inks: Prima chalk edgers (knotted wood, white), Distress (walnut stain), Versamagic (Aegean blue)

Follow my blog with Bloglovin